Showing posts with label birthday. Show all posts

Monday, July 5, 2021

2 Fast 2 Curious - Happy birthday card!

It was my nephew's 2nd birthday yesterday & with some of the lifting of the restrictions, here in Melbourne, we could have our family together to celebrate!!

There were grandparents, aunties, uncles, cousins, siblings & close family friends eating, talking, laughing & enjoying being together, after so long of not being able to!!

And the food was awesome too!!

So of course, with celebrating Julian's birthday, there just had to be a card made for him, from us.

At the moment 2 Fast 2 Furious is out & while Julian doesnt appreciate the movie yet, he does enjoy the cars that he plays with & all things fast!

And he is a curious little thing, learning about his world, by his brother's side.

So this card marched his curious nature, also!!

I drew a grid on the front of the card, (before I assembled it, obviously) & cut out where the black part of the checkered area was to be. Using a craft knife, I then cut out the black squares from a piece of scrap Basic Black cardstock & placed them into the gaps. 

This way the card front was completely flat.

I then ran the Real Red cardstock attached to the Foam AdhesiveSheets through the Cutting & Embossing Machine, using the Playtime Alphabet dies. 
It's so good that some of the letters are doubled up so it makes for a quicker process!!

Then I found some retired All Geared Up key embellishments & attached it with some white twine & punched a couple of balloons - ta-dah!!

Thanks for stopping by, I appreciate you seeing what Ive made.


Card 1: Stamps: None!! 
Cardstock: Basic White, Real Red, Basic Black
Ink: None!!
Stampin' Cutting & Emboss Machine: Playful Alphabet Dies
Accessories:  Foam adhesive sheets, All Geared Up embellishments (Retired), Balloon Punch


Sunday, January 17, 2021

"Opposite Stamp' technique.

During a day at a fellow demonstrator's house, where there were 3 of us together & we sent the day exploring the new products from the latest Holiday catalogue, (scroll to the bottom of the page to download it), & of course, the Saleabration catalogue.

We had such a great day, laughing, eating & creating - we have missed being with others to share ideas & learned techniques.

Speaking of which, Alison showed me this technique & I decided to use it for my Friday Facebook Live. I'd love you to watch it & share your creativity too!! 

These two, (Brilliant Blue & Balmy Blue / Gorgeous Grape & Highland Heather) are reasonably simple, where I have then used the Handsomely Suited stamp set & matching Suit & Ties dies, (10% off the bundle when you purchase them together!!).

You may see in the purple card that Ive used the suspender die so that the cardstock looks more like a piece of ribbon? I love how we can adapt the uses of the dies to fit the project!!


When I was with Alison, I challenged her to make a female version of this card, so she used Magenta Madness & Mango Melody - man, you need your sunnies on for this one!! But it is so perfect at the same time!

And instead of simply stampng on the inside of the card, Ive die cut one of the bows from the Very Vanilla mat & inserted a piece of Mango Melody. This pops against the Magenta Madness, right?

I think this final card may be my fav!! I decided to cover only part of the front of the card & sing the Well Suited DSP, I added another feature to it. That DSP design, (gingham, perhaps?) is quite busy, so toning it down like this makes it easier on the eye.

And that DSP works so well the inside of the card, too!!

I cant wait to try this technique with other stamp sets, they will all look so different, wont they?


During Jan & Feb, it is also Saleabration time, (the first of two this year!!). This is such an exciting time to purchase items - for every $90 of products from the current Annual or Mini Catalogue, you automatically earn a FREE product from the Salabration brochure!!

Be sure to check out which products can be earned for $90 0r $180, to reduce confusion.

And of course, if all else fails, Im here to help you!

Given that it is the beginning of the month, there is a new Hostess Code to use (36ACJASY), if your order is below $250, so be sure to use it when placing your order.

Thanks for stopping by, see you in the next post,

Jo

Card 1 
 Stamps: Handsomely Suited
Cardstock: Brilliant Blue, Balmy Blue, Very Vanilla
 Ink: Brilliant Blue, Balmy Blue
 Stampin' Cutting & Emboss Machine: Suit & Ties dies
 Accessories: Dimensionals, Tear n Tape, Stampin' Blocks, Paper Trimmer

 Card 2 
Stamps: Handsomely Suited, Itty Bitty Birthdays
 Cardstock: Gorgeous Grape, Highland Heather, Very Vanilla
Ink; Gorgeous Grape, Highland Heather
 DSP: Well Suited
 Stampin' Cutting & Emboss Machine items: Suit & Ties dies
 Accessories: Rhinestones, Dimensionals, Tear n Tape, Stampin' Blocks, Paper Trimmer, Bone Folder

 Card 3
 Stamps: Handsomely Suited
 Cardstock: Magenta Madness, Mango Melody, Very Vanilla
Ink: Magenta Madness, Mango Melody
Stampin' Cutting & Emboss Machine items: Suit & Ties dies
 Accessories: Dimensionals, Tear n Tape, Stampin' Blocks, Paper Trimmer

Card 4
 Stamps: Handsomely Suited
Cardstock: Night of Navy, Very Vanilla
Ink: Night of Navy, Pacific Point
DSP: Well Suited
Stampin' Cutting & Emboss Machine: Suit & Ties dies
 Accessories: Dimensionals, Tear n Tape, Stampin' Blocks, Paper Trimmer

 Accessories: https://linktr.ee/JoWeedonMelbourne

Saturday, October 17, 2020

"Life's Better Than" worrying about fixing a decent mistake!! :)


On Friday nights, at 8 pm  (AEST), I like to go Live on my Jo Weedon Melbourne Facebook page.

A challenge was placed on a SU! page using various pre-cut pieces & then make a card, of any theme, so I decided to ask my viewers to help with putting my mystery card together!!

My youngest boy's girlfriend's birthday is today, so it was a great reason to work on a card. And she is so perfect for Darcy, they both looooooove chocolate!!

So of course, "Nothing Better Than" had to be front & centre!

You can watch my Live here & see my big mistake, eeer, I mean opportunity for learning!! 😂

I'm so happy with the end result! I'll definitely be making more using this layout & will absolutely take part in more of these mystery challenges too!!

Happy birthday Bec, we all hope you have an amazing day & a great year ahead!
If there are any products that you see here or on my Live that you would like to purchase, here is a quick On-line shop - be sure to choose the option to have me as your Demonstrator. This makes it easier when you need assistance from me, on-line.


This DSP & many other are now on sale at My On-line shop, within Australia, during the month of October. Dont forget to tick the box to have me as your nominated demonstrator so that I can help you with your order, at any time. 
(If you dont choose a demo, then when you get stuck, we cant assist you - how annoying right?)


Come back to see the next gorgeous things I have to show you, soon. I have so many other items to show off!!

                                                                        Card 1:
Stamps: Nothing's Better Than
Cardstock: Balmy Blue, Early Expresso, Vary Vanilla
Ink: Early Expresso, Crumb Cake
Stampin' Cut & Embossing Machine items: Old World Paper 3D Embossing Folder,Layering Ovals dies, Love You More Than dies.
Accessories: Foam Adhesive Sheets, Mini Dimensionals, a fantastic group of Facey viewers!!

Friday, November 22, 2019

Let's Swap Inspiration!!

During a Stampin' Up! event, one of the best things to do is to swap!!

We can swap cards or 3D items and the buzz is incredible when it happens!!

It's always lovely to introduce yourself while swapping - I just love when I make a connection with who I am swapping, to be someone that I have either followed or even chatted with on-line!

And the ideas, colour combinations & inspiration is so incredible!! Check out a few of these cards!


Margi's card uses 2 pieces of DSP, which we dont see very often & I LOVE IT!!
The Daisy Lane bundle, Butterfly Gala & Stamping Your Way To The Top work so well together.

The Pressed Petal DS & coloured vellum are simply stunning!!


Leonie's card is made just in time for this Christmas! And it is so clean & fresh!! Co-ordinating the Christmas Gleaming & Tidings All Around stamp sets with Sahara Sand & Cherry Cobbler cardstock is a great combination!!

I love it all!!


Monica's card has so many parts to it but it absolutely works!!

She has used the Perenial Essence DSP with Whisper White cardstock & given it height by using the Rectangle Stitched Dies & lifting them up on Dimensionals. Sponging the petals of the punched Perennial Flower gives it depth & makes it a focal point - just beautiful!

This card really does make me smile!!

If any of these cards make you want to create, contact me or my page, to order your own supplies.

Stay close, I'll share more swaps that I have received. They wont disappoint!!


Card 1:
Stamps: Daisy Lane, Butterfly Gala
Cardstock: Whisper White & Think Whisper White, Perennial Essence Vellum
DSP: Pressed Petals DSP
Ink: Merry Merlot, Mossy meadow, Soft Suede
Accessories:  Daisy Punch, Linen Thread, Shimmery Crystal Effect, Perennial Essence Floral Centres, Tear n Tape.

Card 2:
Stamps: Christmas Gleaming, Tiddings All Around
Cardstock: Whisper White, Sahara Sand, Cherry Cobbler
Ink: Sahara Sand, Cherry Cobbler
Big Shot items: Well Written
Accessories:   Linen Thread


Card 3:
Stamps: Tasteful Textures
Cardstock: Thick Whisper White, Whisper White, Daffodil Delight
DSP: Perennial Essence
Ink: Rich Razzleberry
Big Shot items: Tasteful Backgrounds, Rectangle Stiched
Punches: Perennial Flower, Leaf, 1/2' circle
Accessories: Perennial Essence Flower Centres, Dimensional, Tom Bow Glue

Socials:   https://linktr.ee/JoWeedonMelbourne

Thursday, October 31, 2019

Happy birthday hubby!!

It was my husband's birthday last week & while he doesn't like much fuss around him, we still wanted to acknowledge the occasion, of course.

I struggle coming up with a new layout occasionally, so I chose to use one from a previous card I'd made. This card was cased from Brian King, if I remember correctly.

Before we found each other, Brett enjoyed scuba-diving, therefore lots of time was spent on boats to go to the various diving positions in the ocean.

This is why I chose to use the Sailing Home & I 'reckon' it works well!! I tipped the layout onto a landscape card instead & just quietly, I love it!!

 I made this card during a Live Video on my JoWeedonMelbourne facebook page, so if you would like to see that, it is here.

Ive used Night of Navy & Balmy Blue cardstock & dont you just love the effect of the crackle Paint stamp with the Balmy Blue ink on the same coloured cardstock?

And can you see a small area of the Waterfront stamp set being used behind the lighthouse, too?


Inside, I chose to keep it simple, with a small sentiment from Itty Bitty Birthdays & the crisp image o the anchor finished this card off perfectly!!

Im so glad I didnt spend hours trying to come up a new layout, colours & stamp sets, when I can simply change a couple of things from a previous card & have something completely different!!

Thanks for stopping by, leave a comment if you wish, I do love reading them!!

Jo.

Stamps: Waterfront, Sailing Home, Itty Bitty Birthdays.
Cardstock:  Night of Navy, Balmy Blue, Whisper White.
Ink: Night of Navy & Balmy Blue.
Big Shot items: Smooth Sailing dies, Big Shot & plates.
Accessories:   Hessian (R), Stampin' Dimensionals, , Paper Snips, Tear n Tape adhesive, Stampin' blocks.

Socials:   https://linktr.ee/JoWeedonMelbourne


Friday, June 7, 2019

Feeling The Love!!

Last week I mentioned that it was my 10th birthday as a Stampin' Up! demonstrator...

I've had such a great reaching out of friendships from those who have traveled any part of those 10 years with me, it truly was a great week.

I was lucky enough to receive a couple of cards in the mail, along with many messages of support via text or messenger, so I certainly felt the love!!

The first card I received was from Alison, who I spent the day with a few weeks ago... We have been friends for a long time now and are always a great support to each other, about SU! and all things in life, really!
She used the now retired Broadway Bound DSP to make a double opening card - probably the wrong name for it, but I love it either way!!

 The SU side of the card than also opens to her gorgeous message to me. Just beautiful!

The other card that I received is from Ellen, who has a stunning smile and wicked sense of humour to match!! She has used the new stamp set, Crafting Forever with the Lovely Lipstick cardstock.


How fun and bright is her card - these women know how much I love the Bright family

I just love the friendships that I have made throught SU!, they are life long!!

I thought I would also show you the second of the 2 cards that I made to say thankyou to my fellow friends & demos of SU! This was to thank them for their support during the last 10 years of my time with them.

Here I have used the Love What You Do stamp set, the Brayering technique, with the Stitched Nested Label Dies, (what a mouthful, lol). I made 20 of these to send out & I am still amazed that I didnt get bored with making so many of the same things - maybe because I knew how important they were to me?

Well, I'm off now, to catch some sleep before I travel to the other side of town tomorrow with my youngest, Darcy. He will be refereeing all day for a  basketball tournament while I catch up with a special friend - I may even have something to share with you, if we get to create, fingers crossed!!

Happy stamping x

Tuesday, April 30, 2019

Staining Those Maccona Jars.

I showed off the Maccona jars that I coloured for my daughter's 18th party, last week, so this time I will show you how to stain them.

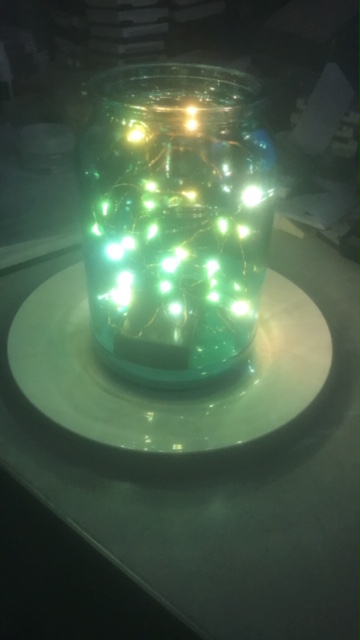
Here it is on the table, with the battery operated lights in it. I also had fresh leaves placed around the base of the jar, so that you  couldn't see the battery pack, but I didnt get a photo of that, unfortunately.


So the process of staining the glass is quite simple, it just takes patience & time.

All I did is make sure the labels are all removed & the gum from the jar is completely cleaned off & they are dry.

Next I dropped 3 drops of blue &5 of green food colouring in the bottom of the jar & then an amount of PVA glue. As I continued with each jar, I learnt how much to put in. It's easy enough to add more along the way, or even tip out what you dont need from each jar.


Then you simply roll the glue and food colouring around & around & around, until you get the coverage & colour that you want.

You can manipulate the glue to ensure it covers the whole area of the jar & just be cautious when you are near the neck of the jar, as it can tip out, obviously.

I preferred to not have any white showing, as I knew when it dried, it would simply be clear & not coloured, so I just took longer to ensure the glue & food colouring was mixed properly.

I loved the ombre effect & I almost didnt want it to dry clear... (Perhaps if I mixed white paint with it, it may not dry completely clear?)

And for some jars I added more green or more blue to the glue, so they were all slightly different, as you looked around the hall.

I stood the jars up-side-down on a cake rack & allowed the excess glue to run out, (or balance it on top of another jar, to use the excess glue for that one) & when it had stopped dripping, I simply tipped it the right way up, cleaned the mouth of the jar & allowed 48+ hours for it to dry.

Make sure you have a sheet of baking paper or similar under the drying rack, it's quite surprising how much drips off.


You can see here how the strength of each jar is different :)

The beauty of doing this is if you want the jars for another project, you simply soak them in hot water & the glue comes off!!


Thanks for reading my instructions on how to stain glass jars, be sure to show me what you make from my ideas too...

Stay crafting,

Jo


Friday, April 26, 2019

Rachelle's 18th has kept me busy!!

In the middle of April, my husband & I celebrated our daughter's 18th birthday with her, family and friends.

There was such a lead up to it & even so, Im so glad that we had planned her party in the middle weekend of school holidays, it gave me even more time to get things done!! As it turned out, I was quite sick with a chest infection, so that week of no work allowed me to get things done in between coughing bouts & the occasional Nanna nap in the arvos helped to get me to the finishing line!!

These are the invites that I made Rachelle to send out a while ago, her choice of colours - aren't they great? Bermuda Bay & Whisper White with a flash of silver & bling are stunning together!!

So with the invites sent out, I began to work on some of the decorations for the tables. We had hired a hall & was having a catering company coming in with roast meats, vegies & bread rolls, so I didnt need to worry about that, yippee!!

I decorated the largest of the Maccona jars & used battery operated lights, to give off a soft look in the middle of each table - there were 16 or so to decorate!!

Did you know that you can remove the inner part of the lid & decorate that too? Luckily I did, because they finished the jars off!

And they turned out great!! The Bermuda Bay cardstock for the 18 & R was embossed with silver embossing powder while the Whisper White cardstock was sponged with Bermuda Bay & then placed onto the larger BB circle.
One of my younger sisters made Rachelle's cake, & it was the highlight of the dessert table!! The pop of purple looked amazing & the taste was fantastic!! Thanks Brooke!

The night went by so fast, that we didn't get many photos, (although there may be more when the disposable cameras are processed!!), but Rach had a great night with her family & friends!! The jelly shots cannot be mentioned for a while though!! LOL!!

We have 20 moths until our next 18th birthday party, lets see what Kyle's colour scheme etc will be, hey?

Tune in next week to see how I decorated the Maccona jars, they really are super simple & can be re-used again & again!!

Thanks for reading,

Jo


Friday, August 17, 2018

Happy 70th Uncle Allan!!

My aunty sat with me at my brother's 30th earlier in the year. She saw my tropical themed card that I'd made for Cameron, using the Bird Banter stamp set, you know the one with all the tropical birds?

Her eyes lit up and she asked if I would make Uncle Allan a similar card for his 70th in August. And yes, of course I would!!


This is the front of his card, using The Back Nine stamp set & the simple sentiment from Picture Perfect Birthday & some glimmer paper, of course!! I think the card front works, without all the other pages also, don't you?

I gave the mat of the card some texture with the Perfect Polka Dot embossing folder, I guess trying to emulate a gold ball, right?

I used a couple of different stamps sets, (thanks Susan for a lend of them), these included: The Back Nine, Sprinkle of Life, Amazing Birthday, (these are retired), Picture Perfect Birthday & Waterfront, (these are current).

As you can see, I used Waterfront upside down & the correct way up, to try to make it look like a golf course with bunkers & dips etc... This was a fun part of the card to be creative with! I then stamped the golf bag image onto the green & yellow with the black ink.

I stamp with Always Artichoke & Soft Sky that are retired & Mint Macaron, So Saffron, Daffodil Delights & Basic Black, all that are still current ink colours.

After stamping onto the Windsor Knot DSP, using Archival Black Ink, I cut out 70 of the wonderful golf bags!! Thank goodness the footy was on, that way I thought cutting them out was super exciting!!


I then lined up all the bags, so that I could try to have different colours next to each other & have a bit of spacing throughout the pages, so that it didn't look too cramped. I used a 2 way-glue stick to adhere them to the cardstock.


12 panels later & Im pretty happy with how it all came together!! 


 So now is the time to have made that card & send it off for Aunty Nola to give to Uncle Allan on his actual day. I can't wait to hear how he received it! It wasn't a challenge at all to make a card for him, my single face cards can take a lot longer than this one took to make, work that out, hey?? :)

Thanks for keeping up with this long post, I appreciate it, truly!! Jo.

Tuesday, May 15, 2018

Kelly's Stamping Friends - Birthday Blog Hop.


Welcome to Kelly's Blog Hop - a celebration of her birthday, friendship & creativity!!

You have just come from seeing the wonderful Rachael's creations, weren't they great!! Im always in awe of people's interpretaion of the theme for a Blog Hop & this one doesnt disappoint!!

So onto my projects!! I have always loved creating something different to what I ususally see products being used for... I gain a lot of inspiration from those who make cards & even produce scrap pages to document their life, but I seem to see less of 3D or Off The Page items...

And so this brings me to my project... Ive had this 'Notice-Board/ Stationary Holder' for well over a few years and simply havent wanted to decorate it. Until the Wood Textures Designer Series Paper came along!! My youngest teen son started the job & I helped him to finish it...we make a great pair, dont we!!

 By keeping the sheets in similar tones, as they ran along the length of the project, it allowed the joins of the paper to not be so obvious. And also, when it is full of the odd peice of Lego, pens, school notes & bills, they wont be so easy to see either, hey?
 And the white paint for the edges, matches with the 'white wash' of the internal dividers also..win, win!!
So before the family realise that they can write on the "Over-head Projector' sheet that is on the 'window' part of the board, I will enjoy the clean lines & organised appearance of my, our, little weekend project... *sigh*

When I finished the Notice Board, I realised that I had another item gathering dust - it needed to be used!!

As you may know, I am friend's with many Stampin' UP! demonstrators & am often encouraged & inspired by them. This time is no different - I recently saw an "Off The Page' project using SU! products, so I hunted around & decided that I would use this frame to show off the gorgeous Statement of The Heart from Stampin' Up! 


Our Statement of The Heart is the core belief that we all hold & it encompases everything that all demos hold true. It is now in a stamp that can be shared & loved by everyone who passes by in my stamp room!!

"To love what we do and
Share what we love
As we help others enjoy creativity and
Worthwhile accomplishments.
In this we make a difference"

Firstly, I painted the wood with white paint, as I often do &I sat very impatiently, waiting for it to dry...

 I then paired the now retired Urban Garden Designer Series Paper, (DSP), with Not Quite Navy ink & Whisper White cardstock. These flowers were apart of a 12 x 12 sheet of DSP & they were screaming to be cut out & slightly re-arranged.
This flower was made by fussy cutting out the image about 6 times, from a sheet of DSP, popped up on Dimensionals & burnished to give the petals shape.
And of course, there needed to be some bling, my Up-line had taught me well!! With just a couple of peals carefully placed, it balances the piece nicely, I believe :)

Thanks for stopping by and seeing my creations for Kelly. I hope she has an amazing year ahead travelling around our incredible earth again - she certainly inspires me to keep doing what we love doing - using Stampin' Up! products, of course!!

And once again: Happy birthday Kelly!!

https://bagsthatone.blogspot.com.au/2018/05/kellys-stampin-friends-birthday-blog-hop.html
If you have lost your way, follow these names to find your way again :)

1.   Kelly Kent

17. Jo Weedon You are here....