Showing posts with label Embossing. Show all posts

Saturday, June 6, 2020

Let's Go Tropical!


Good arvo, (from chilly Melbourne, Australia), I hope you are well & ready to stamp!!

This weeks blog hop theme for Kelly's blog party is New (Normal), as in our world has a new normal now... I took this as being literal & have used a new stamp set! This stamp set isn't one that I would usually use, but seeing as we are at home lately & I won it, (while at a SU! event?), I thought I should have a play with it, of course!

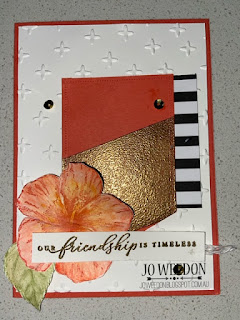
I have this card to show you, using the Timeless Tropical stamp set. I also have a confession - Ive never used this stamp set, it just didnt do anything for me, but I am falling in love with it, now that I'm actually using it!! (Inspired by Susan Wong)

I find it incredible how when changing the sentiment, it can change the way the card looks!!

Ive used the Timeless Tropical stamp set, as mentioned earlier, gold embossing powder, Stitched Nested Labels dies & fussy cut the flower & leaf.

It's such a cheery card, don't you think? You can order these items and more here & have it sent directly to your home - how convenient, right? That way you can work on your own New (Normal) projects too! 

Thanks for stopping by, I love reading all of your comments below.

Click on the image below to go to the next blog and their beautiful work!!


Card:
Stamps: Timeless Tropical
Cardstock: Calypso Coral, Whisper White
DSP: Golden Honey (R)
Ink: Calypso Coral, Pear Pizzazz, Versamark
Big Shot items: Stitched Nested Labels, Criss Cross Embossing Folder (R)
Accessories: Papersnips, Gold Embossing Powder, Aqua Painter, Watercolour Pencils, Peacful Poppies Sequins, Dimensionals, White string

Socials:   https://linktr.ee/JoWeedonMelbourne

Sunday, August 25, 2019

Holiday Catalogue - Sneak Peak Blog Hop

Image may contain: text


Wow!! The year is moving so quickly & it wasn't until I signed up to this Blog Hop that I realised how neglected my Blog is...eeeek!!

So I'm super glad to be here & working on it & finding some inspiration from others.

ESAD is such a wealth of knowledge relating to SU!, as well as giggles, support & inspiration, (as mentioned above!). It is my go-to for SU! questions & beyond!!

Image may contain: text

That being said, let's get to why we are here: this Blog Hop!!
I've decided to work on a couple of cards that show-case items & techniques for the Beginner stamper, but it would also work for the time poor & those who may not have many supplies, for many reasons.

There is something organic & magical about blowing the seeds of a dandelion & watching them float away - I still do it, ad an adult & when I watch them drift away with the breeze, the world stops its ugliness, just for a minute... *sigh*

I've used the Hammered Metal 3D embossing folder, Sweet Silhouettes dies and NO STAMPING as such, only some dragging of the Soft Suede cardstock across the ink pad to give the 'dirt' some texture.

Using the negative part of the dandelion for the wispy parts floating away, it gave my card the sense of movement...& adding a bit of bling, is always necessary, right?


I've cared for turtles for many years & this little stamp image made me smile!!
I cased the first card & then made the second card to give to a turtle professional who helped me when my current little friend was ill. 
In this example, the Hammered Metal embossing folder looks exactly like a turtle's shell, so this card didn't need much else to dress it up.


Did you notice the difference between which way I've used the embossed cardstock?

When I stamped the turtle again, for the inside of the card, I used a baby wipe to wipe away his sadness & used the Basic Black marker to lift his smile the right way!!

During my preparing for this Blog Hop, my order wasn't going to arrive in time, so I raced to my fellow demo's house, Alison & she had purchased the Memories of Home stamp set. While I love the tree & its details, I wanted to team it up with something else, so that it didn't take up the whole card. 

The Dashing Deer stamp looks gorgeous on Cherry Cobbler & then clear embossed, (just like the snow falling, behind the tree).

Adding a simple Red Rhinestone to make this deer the very popular Rudolph, was a given!!

I decided to step up my stamping for the next card. It could encourage the Beginner or Casual stamper to learn new techniques.

 Using our Difference Maker stamp set, Nature's Beauty, (when you purchase this set, a portion of the money is given to various charities), I coloured the gentle doe with our Watercolour Pencils, ran the Crumb Cake ink pad over the Woodlands embossing folder before putting it through the Big Shot. 

I teamed these items with Sweet Silhouettes & Stitched Rectangle Dies with the gorgeous Wink of Stella for a little touch of shimmer.

I do love the dimension that the leaves give & her soft face peeking through the branches! I used this as a swap that I participated in also but I just had to share it with you also!!

Well considering I only had 2 of the items & a stamped image from the incredible Holiday Catalogue, (available from 4 Sep to 2 Jan), I'm pretty happy with how they can be added to various items from the Annual Catalogue.
Increasing the use of each item means that they are more affordable, gets the creative juices flowing & therefore makes even more creations, obviously!!

Thanks for looking at my cards, I's love to hear which product grabbed your attention...& don't forget to subscribe so you don't miss any of my posts.

Happy hopping to the next Blog! Cheryl's work is gorgeous!!

https://chezzakayewandellagal.blogspot.com/2019/08/esad-2019-holiday-catalogue-sneak-peek.html

Blog hop participant list:
13. Jo Weedon              (This is me :)
24. Jackie Aitken
25. Lauren Meiklejohn

Card #1:
Cardstock: Daffodil Delight, Old Olive, Basic Black, Soft Suede
Ink: Soft Suede.
Big Shot items: Hammered Metal Embossing Folder, Sweet Silhouette dies.


Accessories:  Red Rhinestones, Fine Tip Glue, Tear n Tape adhesive, Stampin' blocks.

Card #2:
Cardstock: Mossy Meadow, Crumb Cake, Very Vanilla.
Ink: Momento, Mossy Meadow & Old Olive markers.
Big Shot items: Hammered Metal Embossing Folder, Little Alphabet.
Accessories:  Googly eyes, Fine Tip Glue, Tear n Tape adhesive, Stampin' blocks, baby wipes.

Card #3:
Cardstock: Cherry Cobbler, Crumb Cake, Old Olive
Ink: Crumb Cake, Versamark.
Big Shot items: Dashing Deer dies.
Accessories:  Clear Embossing Powder, Embossing Buddy, Embossing Tray & Brush, Fine Tip Glue, Tear n Tape adhesive, Stampin' blocks.

Card #4:
Cardstock: Mossy Meadow, Early Espresso, Crumb Cake, Very Vanilla.
Ink: Soft Suede, Mometo Black, Mossy Meadow.
Big Shot items: Stitched Rectangle dies, Sweet Silhouettes dies, Woodlands Embossing Folder
Accessories:  Paper Snips, Watercolor Pencils, Fine Tip Glue, Tear n Tape adhesive, Stampin' blocks.


Monday, July 1, 2019

A Double Challenge!!


This week I decided to participate in the Colour INKspiration Challenge #58, BUT boy oh boy, I didn'r realise how much of a challenge it would be for me!!


The colours to use were: Crumb Cake, (yep), Whisper White, (no problem), Gold, (okee-dokee) and Blushing Bride...eeek!! PINK!! And not the singer, either!!

And then I realised that I didn't have any gold embossing powder, which would have worked for me... I lent it to a friend a few weeks ago... Aghghgh!!
No photo description available.

So I used Black Embossing Powder on the Gold Foil!! I haven't done that before, embossed onto Foil... Laying this on a peice of Crumb Cake that went through the Big Shot & Subtle Embossing Folder, gave it some more dimension also...


Gosh, I love a bit of fussy cutting! Although this took no time at all to cut out.

The detail of the Unicorn's mane is so gorgeous on the gold... *sigh* & I lifted all the layers up on Dimensionals.

I also saw that Just Add Ink's challenge this week was to use two of the three items: Foil, Ribbon OR Sequins... So that was an easy step up for my current card - Just add sequins!!


And suddenly I am happy with the card!!
Considering I didn't know what to do with the pink portion of the card AND the gold component, I think it came together ok - and Im okay with okay, lol!!

I guess, this is the whole reason for a challenge, right?

And these two certainly did that to me!!

To see how others interpreted these challenges, just head to the links above and leave a comment for them also :)

Until next time, happy Stampin'... Jo.

Saturday, June 22, 2019

Moving Silhouette Scenes


I saw this stamp set in the new catalogue & hadn't decided if I liked it or not...so I bought it!!

And today saw me participating in a challenge with Just Add Ink #462 & this stamp set needed to be used!
I could imagine the girl on the swing, moving over that blank square... So using that as my first idea, I worked with Leave a Little Sparkle stamp set, (the word: believe) & the Woodland Embossing Folder also.

And it came together!!

So here is my entry for JAI #462. I'm a bit chuffed, I is!!

And for those of you who may be interested to know, I did my very first Live Video from my facebook page tonight!!

It shows you the products that I used for this card. So much excitement for the day, I tell ya!!


So much excitement for the day, I tell ya!!

Thanks again for reading my posts and all the support, I am so happy to be here sharing this with you, Jo x

Friday, June 7, 2019

Feeling The Love!!

Last week I mentioned that it was my 10th birthday as a Stampin' Up! demonstrator...

I've had such a great reaching out of friendships from those who have traveled any part of those 10 years with me, it truly was a great week.

I was lucky enough to receive a couple of cards in the mail, along with many messages of support via text or messenger, so I certainly felt the love!!

The first card I received was from Alison, who I spent the day with a few weeks ago... We have been friends for a long time now and are always a great support to each other, about SU! and all things in life, really!
She used the now retired Broadway Bound DSP to make a double opening card - probably the wrong name for it, but I love it either way!!

 The SU side of the card than also opens to her gorgeous message to me. Just beautiful!

The other card that I received is from Ellen, who has a stunning smile and wicked sense of humour to match!! She has used the new stamp set, Crafting Forever with the Lovely Lipstick cardstock.


How fun and bright is her card - these women know how much I love the Bright family

I just love the friendships that I have made throught SU!, they are life long!!

I thought I would also show you the second of the 2 cards that I made to say thankyou to my fellow friends & demos of SU! This was to thank them for their support during the last 10 years of my time with them.

Here I have used the Love What You Do stamp set, the Brayering technique, with the Stitched Nested Label Dies, (what a mouthful, lol). I made 20 of these to send out & I am still amazed that I didnt get bored with making so many of the same things - maybe because I knew how important they were to me?

Well, I'm off now, to catch some sleep before I travel to the other side of town tomorrow with my youngest, Darcy. He will be refereeing all day for a  basketball tournament while I catch up with a special friend - I may even have something to share with you, if we get to create, fingers crossed!!

Happy stamping x

Saturday, May 4, 2019

Learning The Reflective Technique.

As promised earlier this week, I am sharing how to do the Reflective Technique.

It's quite easy, but feel free to make the same amount of mistakes that I made, so I dont feel so bad, ok?

I used it to make this card, which I taught to my fortnightly class last week. And they enjoyed it - even though I left the acetate at home, oops!! I keep my Project Recipe in those clear document holders, so I cut one of those and we could continue with the project!!

So in order for you to do this technique, it's easiest to follow Maree's video, (she is a fellow Australian Stampin' Up! Demonstrator too!!)

I love her clear video, not just of the actual technique, but the relaxed way she teaches & shows off the various products!!

Thanks Maree, I'll be looking at more of your videos and work in the future :)

Keep Stampin' everyone, I can't wait to see what you have made...

Friday, April 26, 2019

Rachelle's 18th has kept me busy!!

In the middle of April, my husband & I celebrated our daughter's 18th birthday with her, family and friends.

There was such a lead up to it & even so, Im so glad that we had planned her party in the middle weekend of school holidays, it gave me even more time to get things done!! As it turned out, I was quite sick with a chest infection, so that week of no work allowed me to get things done in between coughing bouts & the occasional Nanna nap in the arvos helped to get me to the finishing line!!

These are the invites that I made Rachelle to send out a while ago, her choice of colours - aren't they great? Bermuda Bay & Whisper White with a flash of silver & bling are stunning together!!

So with the invites sent out, I began to work on some of the decorations for the tables. We had hired a hall & was having a catering company coming in with roast meats, vegies & bread rolls, so I didnt need to worry about that, yippee!!

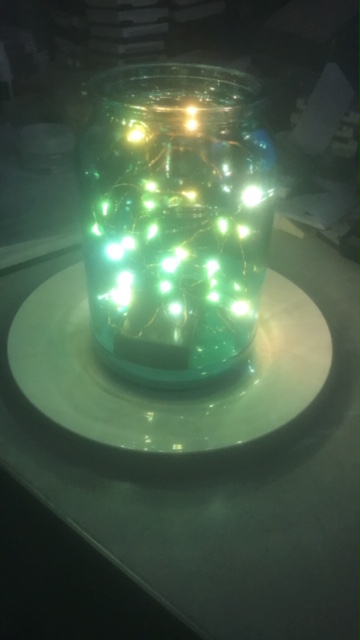
I decorated the largest of the Maccona jars & used battery operated lights, to give off a soft look in the middle of each table - there were 16 or so to decorate!!

Did you know that you can remove the inner part of the lid & decorate that too? Luckily I did, because they finished the jars off!

And they turned out great!! The Bermuda Bay cardstock for the 18 & R was embossed with silver embossing powder while the Whisper White cardstock was sponged with Bermuda Bay & then placed onto the larger BB circle.
One of my younger sisters made Rachelle's cake, & it was the highlight of the dessert table!! The pop of purple looked amazing & the taste was fantastic!! Thanks Brooke!

The night went by so fast, that we didn't get many photos, (although there may be more when the disposable cameras are processed!!), but Rach had a great night with her family & friends!! The jelly shots cannot be mentioned for a while though!! LOL!!

We have 20 moths until our next 18th birthday party, lets see what Kyle's colour scheme etc will be, hey?

Tune in next week to see how I decorated the Maccona jars, they really are super simple & can be re-used again & again!!

Thanks for reading,

Jo


Sunday, June 3, 2018

ESAD 2018 Annual Catalogue Launch Blog Hop


Wahooooo!! Here we are at another Blog Hop!! This time for ESAD..

                                       
What a way to celebrate the newest and most exciting catalogue!! I immediately loved how bright and cheery it was, when I saw it at OnStage!! And now that the catalogue is live, you can purchase anything from it, by following this link.

Seeing Bronwyn's items makes me just want more items, is that the same for you?
I guess it's time to look at what Ive created, right?

Well in between deciding what to make and actually producing something, I had a little help...
I've deliberately placed this basket on my table because Tiger likes to sit & observe what I'm  doing & he doesn't always sit in the best place - hence the basket!!


Except this time he wanted to play with my scraps of paper - clearly he is excited by the new products too!!

And this is what the scraps came from... Using one of the peices from the Stained Glass Die Set, I cut out the peices & attached them together for a fence. As soon as I saw this peice I knew it reminded me of a picket fence running along a property, just like I use to walk past in my Nanna's country town of Goorambat, near Benalla... Needless to say, my idea worked!
This is nothing like what the original card idea was, in my mind, but I am super happy with it, either way!
The fence is up on Dimensionals so that the piggies are flat against the card. I do just love their happiness in being together, dont you?
 Ive used 4 separate stamp sets for this card, (Sea of Textures, This Little Piggy, Enjoy Life & Animal Outing), 2 Die sets, (Bottles & Bubbles and Stained Glass) & 1 Punch, Cookie Cutter)
 The card stock is Pear Pizzazz, Early Expresso, Very Vanilla & our new In-Colour, Powder Pink.

 And wasn't it a challenge to cut the Dimensionals so that they raised up the love hearts - they are so tiny!!

Next was to use a stamp set that I won for attending OnStage in Sydney back in April. This stamp set, named In Every Season is certainly not one that I would usually even glance at, so the challenge was on to make good use of it...
 All of the images are small, so I wanted to showcase one of them & making my own DSP, (Designer Series Paper) seemed to be the perfect was to show it off!!

I used Versamark and stamped it numerous times, then applied Black Embossing Powder and heated the images. And this is the result :)
And this Painted Glass sentiment is just the perfect one for this card!! Adding a few Rhinestones throughout the card and then on the sentiment is all that was needed to finish it off!!

I have a close friends' son who has recently asked his girlfriend to marry him, so Im thinking this card will be for them...

Thanks for stopping by to see my creations. I'd love for you to leave me a comment about my cards and then continue with the Blog Hop... Be sure to visit them all, you will be truly amazed by everyone's creativity!!

Click on the image below to follow the links....


Alternatively, you can follow the links this way....


21. Jo Weedon            (You are here)