Tuesday, April 30, 2019

Staining Those Maccona Jars.

I showed off the Maccona jars that I coloured for my daughter's 18th party, last week, so this time I will show you how to stain them.

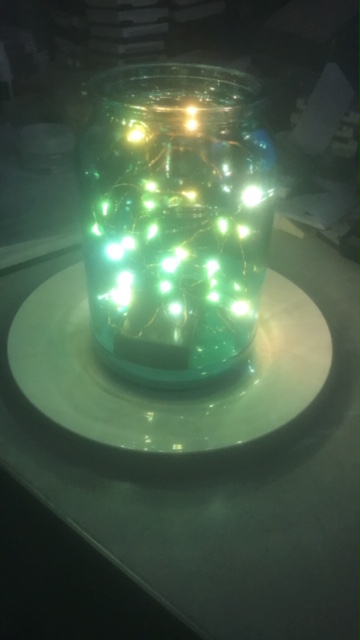
Here it is on the table, with the battery operated lights in it. I also had fresh leaves placed around the base of the jar, so that you  couldn't see the battery pack, but I didnt get a photo of that, unfortunately.


So the process of staining the glass is quite simple, it just takes patience & time.

All I did is make sure the labels are all removed & the gum from the jar is completely cleaned off & they are dry.

Next I dropped 3 drops of blue &5 of green food colouring in the bottom of the jar & then an amount of PVA glue. As I continued with each jar, I learnt how much to put in. It's easy enough to add more along the way, or even tip out what you dont need from each jar.


Then you simply roll the glue and food colouring around & around & around, until you get the coverage & colour that you want.

You can manipulate the glue to ensure it covers the whole area of the jar & just be cautious when you are near the neck of the jar, as it can tip out, obviously.

I preferred to not have any white showing, as I knew when it dried, it would simply be clear & not coloured, so I just took longer to ensure the glue & food colouring was mixed properly.

I loved the ombre effect & I almost didnt want it to dry clear... (Perhaps if I mixed white paint with it, it may not dry completely clear?)

And for some jars I added more green or more blue to the glue, so they were all slightly different, as you looked around the hall.

I stood the jars up-side-down on a cake rack & allowed the excess glue to run out, (or balance it on top of another jar, to use the excess glue for that one) & when it had stopped dripping, I simply tipped it the right way up, cleaned the mouth of the jar & allowed 48+ hours for it to dry.

Make sure you have a sheet of baking paper or similar under the drying rack, it's quite surprising how much drips off.


You can see here how the strength of each jar is different :)

The beauty of doing this is if you want the jars for another project, you simply soak them in hot water & the glue comes off!!


Thanks for reading my instructions on how to stain glass jars, be sure to show me what you make from my ideas too...

Stay crafting,

Jo


Sunday, April 28, 2019

ESAD So Long Old Favourites Blog Hop


Old friends are always hard to say goodbye to, arent they? And by old, I mean longtime friends, like one of our Mother's Group mums who lives in Hobart, Tasmania.
 It's always hard to say goodbye to her.. *sigh*

Thankfully, being a Stampin' Up! demonstrator means that while we are saying goodbye to some much loved products, we know that new ones are coming!! Just one of the many perks of being a demo!!

Another perk is being a member of the inspiring group we lovingly call ESAD. The details are below & you really cant put into words the warm n fuzzy feeling you get from being with such a wonderful group of like minded people!!


With the house-keeping stuff out of the way, let's get onto the reason we are here: what we have created to share with you... & you would have come from Siobhan's  blog. I must say that I've spent a bit of time looking at her work & it's stunning!!

I'm so glad you took part in the blog hop Siobhan, I love what you do :) Now, onto my work...

I loved this Bubble Over stamp set when I saw it & yet, I havent used it much at all?? And then this blog hop comes along & I drag it out & dust it off AND I"M LOVING IT AGAIN, go figure?

The fun of this set makes me smile. And weddings are meant to be fun, right, so this card had to be also...


Ive used Bubble Over, as mentioned, the Bottle & Bubbles dies, the Polka Dot Basics embossing folder with Lemon Lime Twist & Berry Burst cardstock.

Both of the main colours haven't grabbed me for 2 years & now I'm loving them too! Crazy, hey?

The only current items are the Whisper White & Basic Black cardstock, StazOn ink & Vellum, so I was pretty happy with how this worked out.

My next project came about because I participated in my first challenge over the weekend. The challenge presented was to make a card using Basic Black, Whisper White & a pop of colour.

It had me thinking, but after making the previous card, I had it worked out.

Here I teamed up Swirly Bird stamp set with the matching dies, Swirly Scribbles & Follow Your Dreams. I believe this technique is called "Inset", where you make a puzzle essentially with the various pieces...


My last creation I'm sharing is using the So Santa stamp set teamed with Botanical Butterfly DSP. I so want it to be summer again, as we begin to approach winter, I just yearn for the sun on my face, but maybe not as much as poor Santa, he could do with a hat for protection!!

And learning how to do the Reflective technique was simple & fun too - I'll share that this week, in another post, so be sure to come back :)

Of course, us demos wouldn't usually show off the light bouncing off the embossing powder, but I just had to show you how it looks like water, right!!

I've used more current items on this card: Balmy Blue ink & cardstock, Watercolor Pencils with the Aqua Paint Brush, StazOn Ink, Balmy Blue, Whisper White & Basic Black cardstock.

I do always enjoy using DSP differently to how it was intended, ie: butterflies on a card or scrap page...

The other thing I loved about this whole process was that I needed my 16 year old son to take the photos for me, as the camera on my Iphone is broken. So Kyle organised the way the light should be, how the card should be standing etc & took the photos for me - he did okay, didn't he!!
Thanks mate.

I hope you have enjoyed my items, I absolutely enjoyed the challenge of making them for you, be sure to come back for more inspiration sometime.

Click on the green sign here, to go to Peta's blog, tell her I said 'hi'...


Blog hop participant list, from here onward:

14. Jo Weedon - https://joweedon.blogspot.com/…/esad-so-long-old-favourites…
15. Peta Stephen - https://www.stampincat.com.au/esad-so-long-old-favourites-…/
16. Lisa Whitehead - https://stampwithlisa.co/esad-so-long-old-favourites-blog-…/
17. Rochelle Laird-Smith - https://stampingflair.com/esad-so-long-old-favourites-blog-…
18. Rebecca Scurr - https://thepaperandstampaddict.com.au/…/so-long-old-friends/
19. Mandy Depiazzi - https://mypapertrailblog.wordpress.com/…/esad-so-long-old-f…
20. Denise Buetler - http://www.stampinup.net/esuite/home/denisebuetler/blog…
21. Monique Fielder - https://stamping-with-moni-q.blogspot.com/…/esad-so-long-ol…
22. Kelly Kent - http://mypapercraftjourney.com/…/esad-blog-hop-so-long-old…/
23. Sharon Dalton - https://studioshabazcreativeme68.blogspot.com/…/esad-so-lon…
24. Rebekah Crisp - https://bcreativewithberyl.wordpress.com/…/so-long-old-favo…
25. Maree McIntosh - https://stampwithmareescards.blogspot.com/…/esad-april-2019…

1. Bronwyn Eastley - http://addinktivedesigns.com/…/esad-so-long-favourites-blo…/
2. Libby Dyson - http://libbystampz.com/so-long-old-favourites-blog-hop/
3. Katrina Duffell - https://inkpapergirl.com/?p=13579
4. Lou Kitzelman - https://withabowontopbylou.blogspot.com/…/esad-april-2019-s…
5. Shannon Kissane - http://shannonkissane.com/?p=3064
6. Nicole Wilson - https://nicolejuliewilson.blogspot.com/…/so-long-old-favour…
7. Delys Cram - https://delyscram.com/…/esad-so-long-old-favourites-blog-h…/
8. Lauren Meiklejohn - https://laurenmeiklejohn.wordpress.com/?p=5792
9. Cathy Pinchbeck - https://wp.me/p3zFY4-rV
10. Sandra Mastello - https://www.violetvspurplepapercrafts.com/?p=25912
11. Richelle Fletcher - https://stampingwithrichelle.blogspot.com/…/esad-so-long-ol…
12. Rose Packer - https://wp.me/p6g0iC-1k9
13. Siobhan Fitzsimmons - https://hightreeshouseofcards.com/…/so-long-to-old-favourit…

Friday, April 26, 2019

Rachelle's 18th has kept me busy!!

In the middle of April, my husband & I celebrated our daughter's 18th birthday with her, family and friends.

There was such a lead up to it & even so, Im so glad that we had planned her party in the middle weekend of school holidays, it gave me even more time to get things done!! As it turned out, I was quite sick with a chest infection, so that week of no work allowed me to get things done in between coughing bouts & the occasional Nanna nap in the arvos helped to get me to the finishing line!!

These are the invites that I made Rachelle to send out a while ago, her choice of colours - aren't they great? Bermuda Bay & Whisper White with a flash of silver & bling are stunning together!!

So with the invites sent out, I began to work on some of the decorations for the tables. We had hired a hall & was having a catering company coming in with roast meats, vegies & bread rolls, so I didnt need to worry about that, yippee!!

I decorated the largest of the Maccona jars & used battery operated lights, to give off a soft look in the middle of each table - there were 16 or so to decorate!!

Did you know that you can remove the inner part of the lid & decorate that too? Luckily I did, because they finished the jars off!

And they turned out great!! The Bermuda Bay cardstock for the 18 & R was embossed with silver embossing powder while the Whisper White cardstock was sponged with Bermuda Bay & then placed onto the larger BB circle.
One of my younger sisters made Rachelle's cake, & it was the highlight of the dessert table!! The pop of purple looked amazing & the taste was fantastic!! Thanks Brooke!

The night went by so fast, that we didn't get many photos, (although there may be more when the disposable cameras are processed!!), but Rach had a great night with her family & friends!! The jelly shots cannot be mentioned for a while though!! LOL!!

We have 20 moths until our next 18th birthday party, lets see what Kyle's colour scheme etc will be, hey?

Tune in next week to see how I decorated the Maccona jars, they really are super simple & can be re-used again & again!!

Thanks for reading,

Jo