Friday, November 15, 2019

Everybody is Somebody.

I work in a neighbourhood house & we all work incredibly hard, given the clientele & their various needs.

While we are all an amazing team, we wouldn't be able to do as well as we can without the assistance of many volunteers.

So each year our workplace puts on a dinner, cooked in-house, for all the volunteers throughout the year that have helped us. They may have folded flyers for the courses we offer for mailing out, may have helped with translating during conversations with newly arrived refugees or directly assisted our English teachers in the classroom.

What ever they have helped our services, they are being recognised during this dinner.


There has to be a selfie during such a wonderful gathering, right? Here are some of our volunteers, staff & me!!

This occasion calls for a card that will convey our gratitude to each & everyone on our volunteres.


This card has a single layer of Whisper White & uses a couple of colours for the garden image.

This stamp set, stunning, isn't it!! It is 'Inspiring Iris' and has such a gorgeous image using 2-step stamping to produce the image you see.

The flower buds & stems have an out-line image and then the block of colour to finish. I simply used the D block directly onto the ink pad, stamped off onto scrap paper & then onto the base of the card. (This is known as 2nd generation stamping).

And that verse!!
'You are somebody
who makes everybody
feel like somebody'

It's just perfect for our Earth Angels that are our volunteers! Manjit, our Volunteer Co-Ordinator, (in orange, in the above group photo), wrote a personal message in each of the 36 cards, too!!

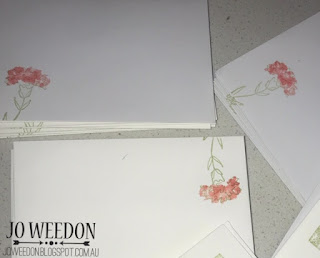
And of course, the envelope NEEDS to be decorated also. These were placed at each person's table setting with a small gift from the staff at Glenroy Neighbourhood Leaning Centre.
 Maurie is one of our volunteers, who having been out of action for a while, is back with us - we are so glad!!

Gabrielle is a wonderful co-worker, I value our friendship so much.


I'd love to hear what you think of them, feel free to leave a comment...
Thanks again, Jo.

Stamps: Inspiring Iris
Cardstock: Whisper White
Ink: Mint Macaron, Calypso Coral of Flirty Flamingo

Socials:   https://linktr.ee/JoWeedonMelbourne

Tuesday, November 12, 2019

Kylies blog hop November


This month I have decided to take part in Kylie Bertucci's Blog Hop. I'm super excited that you are here!!

You may have come to my blog through someone else or you may start here, either way, you can click on the names at the bottom of my post & this will take you to the next persons blog & their amazing project!!

In this (long) Blog Post, I've decided to show you another way to use our stunning Designer Papers, (DSP) in my post.

I just love how versatile the products are, to so many varied projects!! I'm showing off the bright & bubbly 'See A Silhouette' DSP.

I've always loved 3D items & this type of MDF craftwood allows itself to be decorated so easily.


Checking out all the edges of the MDF, I ensured there are no rough edges or broken parts to the item.


I then painted all of edges that will be exposed when it is finished. I went with white due the classic finish & it is one of the colours in the DSP that Im using.

The biggest frustration with this is to wait for the paint to dry!!

 A work in progress!

 I almost always give the edges 2 coats, but today I did 3, it simply gives a better finish. The top piece has only 2 coats & I could still see the colour of the wood through the paint.


I always make sure that any dribbles of the paint are either rubbed , or wiped away with a slightly damp cloth so that they are flat. If they aren't, then the DSP wont lay flat on the wood - the buckled look doesn't work for me!!!

Once the paint is completely dry & I mean completely, I turn it over and run the Tear 'n Tape all over the piece of wood. Including the small space.

I chose which design I wanted for each piece, keeping in mind that (1) it needs to be the correct way up when standing, (if there is a top & bottom to the DSP & (2) it shows off the correct side of DSP that I want!


Using a sharp craft I began to cut the shape of each peice, ensuring the DSP is facing the in-correct way when I do so. I want the correct side to be showing when I adhere it later.

I also made sure that I laid the wood down the correct way, some pieces are mirror images, therefore if I place them down the same, it wont fit together later.

You can choose to make a template of your pieces first, but I'm happy to cut directly around the wood, being very careful to not slip & cut the wrong part of the sheet of DSP.

This is where I have to concerntrate, so the design I want to see is the correct way up when adhered, too!! (Please cross your fingers for me!!)

(insert photo)

Don't run your DSP into the areas where another piece will go into the grooves, they are made precisely to fit into  the holes so won't allow for DSP or cardstock.


Where there are holes in the design, (good ones, right!!), I cut them out carefully & slowly.

Once I had completed this part, I was able to start building my little shelf.


Ta-dah!! This took about 2 2/1 hours to complete, not including drying time - what a lovely Sunday afternoon task!


It's creative, enjoyable & functional!!

Thanks for stopping by, Im so happy to have been apart of Kylie's blog hop!!


Cardstock: See A Silhouette Designer Paper
Accessories: Craft knife, Tear 'n Tape', MDF product of choice
Socials: https://linktr.ee/JoWeedonMelbourne

Saturday, November 9, 2019

Weddings Are Wonderful!!

On Monday, Brett & I were guests at long time family friends' son's wedding.

Gosh it was beautiful!! It was held in a large warehouse that caters for many functions.

They met 8 years ago & we have seen their love grow throughout their years together.

So this called for a special Wedding card, of course.

I teamed Beauty Abounds with Painted Glass, all Copper Embossed & used the Cross Of Hope dies.

I just love how a single layered card can still 'pop!!"


Here they are, almost married!!

Just beautiful! We are so grateful to have been at their wedding and we wish them all the happiness throughout their lives...

Thanks for reading, Jo.
Stamps: Painted Glass & Beauty Abounds
Cardstock:  Very Vanilla & Copper Foil Sheets.
Ink: Versamark
Big Shot items: Nested Labels Dies, Cross Of Hope Dies, Big Shot & Plates.
Accessories:    Copper Embossing Powder, Embossing Buddy, Stampin' Dimensionals, , Tear n Tape adhesive, Stampin' blocks.

Socials:   https://linktr.ee/JoWeedonMelbourne

Wednesday, November 6, 2019

I Can Teach You How To....

If you live in the surrounding suburbs of Sydenham/Hillside, the North Western suburbs of Melbourne, then you are able to come to my in house classes!!

Or if you are willing to travel, perhaps?


My next public class in my Stamp Room is on Monday November 11, at 7 pm.

Details can be found here: https://joweedon.stampinup.net/

Bring a friend, I'd love to see you all here !!