How exciting is it, to be seeing all these creative peices of work!! This is my first blog hop & Im loving everyone's interpretation of the wonderful Stampin' Up! product!
And it doesn't matter where you started, you will eventually see everyone's work!! I do love what
Emma made with her products, I haven't seen her work before, but I will certainly be
stalking, I mean following her blog!!
Many of you may know that I am, proudly, a Stampin' Up! demonstrator & have been for 6 years now. Of course, because of that, we get to share ideas, sneak peaks & tutorials about the SU! products, but the added bonus is the friendships & support I have received from all over Australasia. This un-expected family of Stampin' Sisters & Brothers, (yes males can join also!!), make this company a fantastic one to work for!!
So.....(drum roll, please...), with all the official 'paperwork' done, here are my items to share with you...
While the
Holiday Catalogue has lots of lovely Christmas stamps & embellishments, I decided to use one of them for a couple of completely different projects....
We had Father's Day here last week & my dad loves all things fishing & camping.
I always like to live life 'outside the box', so when I saw a different way to use the Bird Builder , I immediately had to use it, differently!!
While I wanted the sun to be a feature, I didn't want it to take over the whole card, so stamping it at the back worked for me. I then cut the rolling hills freehand, & used the Perfect Pines Framelits to make a forest & the Bird Builder & Word Window punch for the fire. I sponged the sunset, hills, trees & fire before sticking it all down with either Dimensionals or Tear & Tape.
I am a bit happy that it seemed just perfect for the occasion & for my Dad!!
To continue to show you how the Stampin' Up! products are so versatile, I have used the beautiful bird from another Christmas Set, Joyful Season. I have a very close friend whose mum passed away 2 years ago & blue birds remind her of her gorgeous mum.
As soon as I saw this set, I began to work out how I would use this bird for her Mother's anniversary. Using the 2 step stamp set with Marina Mist ink, I placed the bird on our thick padded tape, Dimensionals to help her stand out...
I also used the Marina Mist marker to ink only the "Thinking of you", when the full sentiment actually says, "Thinking of you at Christmas". This is a great technique for isolating a certain part of a stamp. This stamp is from the Embellished Ornaments set :)
I believe this card would lend itself to being a great Male Birthday card or even a Sympathy card?
Ok, onto Christmas, hey? You know there is only 105 sleeps until Christmas, right - time to get moving on some ideas!!
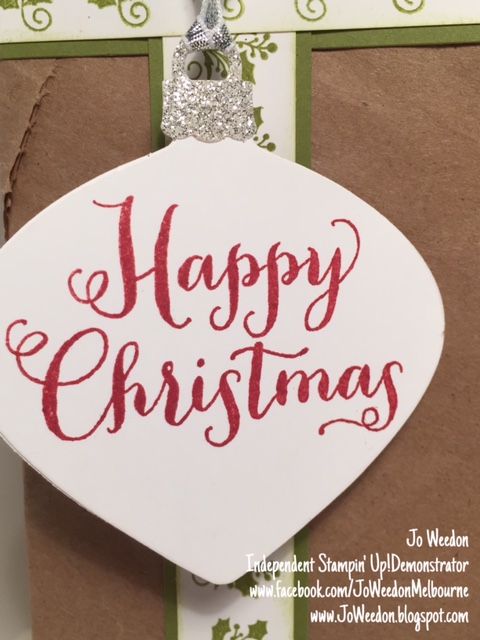
Here I have wrapped a present using the brown packing paper that our orders come in. , I just love up-cycling & this is a very cheap but effective way to wrap the special gifts for loved ones.
I stamped the tiny holly image with Old Olive onto Whisper White, matting it with Old Olive cardstock.
One thing you can be sure of is that the ink, cardstock, ribbon & embellishment match so well through Stampin' Up! products, it makes colour matching so easy for brain dead people like me!!
In this close-up of the Embellished Ornament , you can see the Crystal Effects shining & the sparkliness of the Glimmer Paper, just gorgeous!! I've stamped the sentiment on Whisper White & stuck that on the back, so it is also now a tag for my present!
Can you hear me smiling from my stamp room?
One of many things that Stampin' Up! has taught me, is how glorious it is to have matching items - therefore I used the 'template' of my present to then make a matching card... I discovered along the way that the 1 3/4 circle punch is an exact fit for the smaller of the ornaments, so this helped my card to come together so quick!! Again, I used Crystal Effects to give the glass effect.
It may be hard to see, but I have cut each peice of cardstock so that the complete card is only 1 layer thick, rather than many layers. It gives a cleaner finish, dont you think?
Here are both the present & card together, a match made in Christmas Heaven, lol...
All in all, Im very happy with how they compliment each other so well :))
Thanks for looking at my work, Id love you to leave a comment to tell me which ones you liked or to ask any questions about how I've made something you have seen...
I hope that Ive inspired you to get Stampin' too!! Feel free to come back to see what else I've been working on at other times, also..
From my blog here, you can continue to drool at:
Rebecca
Andrea
Rochelle
Kathryn
Monique
Bernie
Liv
Sally
Ria
Delys
Jessica
Lou
Barbara
Kelly
Jenny
Libby
Paula
Keryn
Carly
Rachel
Narelle
Emily
Emma
Thanks again :))