Showing posts with label Circle Punch. Show all posts

Friday, March 16, 2018

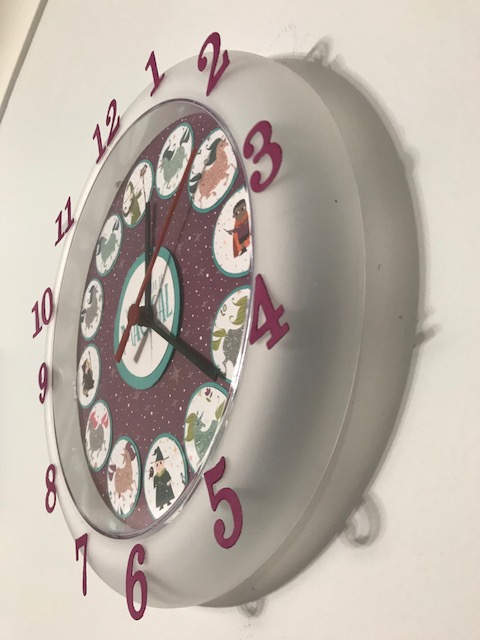
A White Clock...How boring!!

The child care centre that I work in, has had that same clock since it's opening over 10 years ago...

And it decided to stop working after all this time...

So one of my partners in crime bought this clock so that we could still record the children's sleep, time of pick-up & of course, medication times, if we needed to.

But we couldnt just have  a boring white clock now, could we?  NO - YUCK!!

So using the Mythical Creatures Designer Paper & co-ordinating cardstock, punches & dies, I was able to create something that works sooooo much better & is so much more appealing for the little people in our care!!

 I learnt, by damaging 2 other clocks, that the hands are not supposed to be pulled out & so I had to cut the top layer of the Whisper White cardstock. This allowed the cardstock to sit flat & yet allow the hands to rotate properly, as they should, right??

And of course, the numbers had to be an addition to this clock - it is a learning tool, after-all!!

I do love how this turned out, sooo much better than the white, plain clock, dont you agree?

Thanks for stopping by, come back soon to see what else Ive been working on :)

Friday, February 12, 2016

Bring On The Sweet Stack!!

I have always wanted a centre-peice for my table, for when it is clean... I'm also hoping it would encourage me to keep it that way...?). So I decided to purchase the Sweet Stack Project Kit, (page 152)  This actually the first kit that I have ever bought, crazy hey?

Well, this kit has changed my mind about kits - I loved knowing what to make, following the directions, but also knowing that I could mix it up a little, to make it mine!


So from above, you can see that Ive tried to make the Crushed Curry "icing' the same all the way around the edge of the lower level & I used the Bow Builder punch for a different bow than in the kit. (I can use them for another project!!) The trim on the cake is also different to the kit, it needed a little bit more colour, I thought...


Here is the finished product!! I plan to have each cake peice filled with a small gift for anyone who brings a new guest to my class... Could this be you, perhaps?

Thanks for stopping by to see my latest crafty ideas... I hope to see you again soon, Jo.


Monday, April 6, 2015

My Easter Gift

Wowzers, it's been a while since my last post... Work deadlines, migraines and school holidays have caused all that, sadly...anyway, back to why we are here, right :)

Our  family does small gifts at Easter, so I decided to use one of my many, many Maccona jars for one of them.  My gorgeous neice Rillie loves all things a bit freaky, so this fitted the bill, totally!!

I decorated the jar using retired Designer Paper and the Bow Tie punch, amongst others, coming up with this funky bunny to match the belly band around the jar.


And in all the yumminess of chocolate, I buried these hair ties. a bit cute, hey?
I hope Rillie doesn't think that we are only giving her a jar of chocolate, 'cos these will look great in her stunning hair!!


Saturday, March 21, 2015

I Can Barely Contain Myself!!

I was almost ready to pack up all the items I wanted to take to the market, for a local event.

After I finished the bunnies and they were all on their respective container, I was talking outloud about how the containers needed to be 'up' and visable to everyone walking past the table.

So this is the way that my 10 year old son suggested to display my Easter Bunny containers.

Very ingenious, I think!!
This meant that all the bunny containers were seen by the children and their mum or dad!
Mission accomplished!!

I was so impressed with Darcy's thinking, well done mate!!

Tuesday, March 17, 2015

Getting Ready For Easter!!

I had a local school market for a Primary School on the weekend, so wanted to make sure that I had something for the children to enjoy!
I had seen lots of punch-art on Pinterest or the normal internet sites, but couldn't make them, because the punches that I had, didnt quite work...

So I decided to turn off the laptop and begin to make my own bunny. And this is how this cutie came about!
The new Bow Builder Punch makes this gorgeous little bow, just perfect for this project!

 I tell ya tho, the fishing line whiskers were very trying!! I needed to concentrate to put those under the little bunny nose!!
And the little splash of bling with the rhinestone finished them off!

Once I was happy with one little rabbit, I needed to make more, of course! So then I decided to make 40 of them..

Once each bunny was punched, sponged, glued and completely built, they were placed, front and centre on these containers that I have had laying around for about 3 years!! (Nothing like rushing into using them quickly, hey?)


I am so hoppy, oops, I mean happy with how they have turned out AND it is my design!!

I had so many positive remarks about my bunny containers, it was lovely to hear that they were received so well.

Come back in a couple of days, to see how my 10 year son came up with an ingenious way to display my containers, so that they were seen by everyone...
Thanks for stopping by :)

Sunday, March 23, 2014

A Production of Pigs!!

With only a week to go for the Fiesta at my children's school, I am trying to make items that will appeal to many of the 1300 children that attend there...so I discovered punch art for a fun looking Pig and have adapted her to the tools that I have. I am quite happy with the results, just quietly!

While there was a bit of preparation involved, there were things I could do while watching TV with my family. I could sponge around the pig's face or punch out the various shapes to help bring her together.

Here is the recipe I put together to show you how to make my pig.


I also love that most of these shapes, apart from her face & body, were made from the scraps of the larger shapes and/or from other scraps. That's gotta be a great use of resources!!

This is a stage by stage photo  :)


In hindsight, I changed the way her legs & shoes were organised.

Oh and I am very aware that we cannot copy licensed charactors, but  I just love the way that the punches we have in the Stampin' Up! catalogue, have such versatility!!

I think she fills the card well, without much more needing to be added.

Now Im off to make another 15 pigs...then it's time for some Mother's Day cards, stay tuned :)

Happy Stampin'!!